
A pod stuck in Pending. A container restarting every two minutes with no obvious error. Traffic hitting a pod that isn't ready yet. These are some of the most common Kubernetes problems — and most of them make complete sense once you understand what Kubernetes is doing at each stage of a pod's life.
This article walks through the full lifecycle from the moment you run kubectl apply to the moment a pod is cleanly terminated. Understanding this sequence is one of those things that makes debugging dramatically faster.

Stage 1: Scheduling (Finding a Home for Your Pod)
The moment you apply a manifest, the Kubernetes API server stores it in etcd. Your pod exists but has no node assigned yet — it shows as Pending. The scheduler's job is to pick the right node.
It does this in two passes. First, it eliminates nodes that can't run the pod — nodes that don't have enough CPU or memory to satisfy the resource request, nodes with taints your pod doesn't tolerate, nodes that fail affinity rules. Then, from the remaining candidates, it picks the best one using a scoring system.
When a pod stays in Pending, this is almost always why:
kubectl describe pod my-pod -n production
# Look for Events at the bottom:
# Warning  FailedScheduling  0/5 nodes are available:
# 2 Insufficient cpu, 3 node(s) had taint that pod did not tolerate
The message tells you exactly why it couldn't schedule. Read it — it's rarely cryptic.
Stage 2: Init Containers Run First
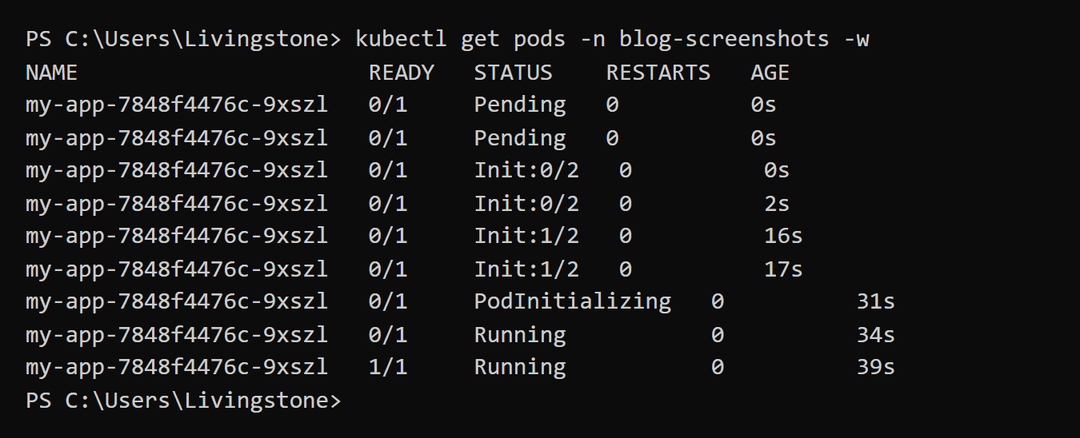
Before your main application starts, init containers run in sequence. Each one must complete successfully before the next one starts. They're useful for setup tasks — waiting for a database to be ready, running migrations, seeding configuration files.
initContainers:
- name: wait-for-db
  image: busybox
  command: ['sh', '-c', 'until nc -z postgres 5432; do echo waiting; sleep 2; done']
- name: run-migrations
  image: my-app:latest
  command: ['node', 'migrate.js']
If an init container fails, Kubernetes keeps restarting it. Your main containers don't start until all init containers have finished successfully. A pod stuck waiting here is a common cause of confusing startup delays. Part 4 of this handbook goes deeper on init containers and when a sidecar is the better fit.
Stage 3: Startup (Probes Are More Important Than You Think)
Once your containers start, Kubernetes needs to know when they're ready. This is where readiness and liveness probes come in — and where most deployment incidents originate.
Readiness probe: "Is this container ready to accept traffic?" Until this passes, the pod is not added to the service's endpoints. Traffic won't reach it.
Liveness probe: "Is this container still alive?" If this fails repeatedly, Kubernetes restarts the container.
readinessProbe:
  httpGet:
    path: /health/ready
    port: 8080
  initialDelaySeconds: 10   # Wait before first check
  periodSeconds: 5          # Check every 5 seconds
  failureThreshold: 3       # Fail 3 times before marking unready

livenessProbe:
  httpGet:
    path: /health/live
    port: 8080
  initialDelaySeconds: 30   # Give the app time to start up
  periodSeconds: 10
Don't use the same endpoint for both. Your readiness endpoint should check real dependencies — can I reach the database? Is my cache warmed up? Your liveness endpoint should only check if the process itself is functional. If liveness checked dependencies, a database outage would trigger container restarts, which doesn't help anyone.
Stage 4: Termination (What Actually Happens When a Pod Is Deleted)
This sequence trips up a lot of engineers. When you delete a pod (or a deployment update replaces it), here's exactly what happens:
- Pod is marked Terminating. Kubernetes removes it from the service endpoints — traffic stops going to it.
- The preStop hook runs, if you defined one.
- SIGTERM is sent to the containers.
- Kubernetes waits up to terminationGracePeriodSeconds (default: 30 seconds).
- If the container is still running, SIGKILL is sent. No more waiting.
The subtle issue: there's a small delay between step 1 (removed from endpoints) and step 3 (SIGTERM sent). During that window, some requests might still be routed to this pod. A preStop sleep covers it:
lifecycle:
  preStop:
    exec:
      command: ["/bin/sleep", "5"]
And your application needs to handle SIGTERM by draining requests cleanly before exiting:
process.on('SIGTERM', async () => {
  // Stop accepting new requests
  server.close(async () => {
    await database.disconnect()
    process.exit(0)
  })
  // Force exit before SIGKILL arrives
  setTimeout(() => process.exit(1), 25000)
})
Once you understand this sequence, a lot of Kubernetes behaviour that seems mysterious starts to make complete sense.

Comments
All comments are reviewed before appearing.
Leave a Comment